

Make a point of visiting us weekly!

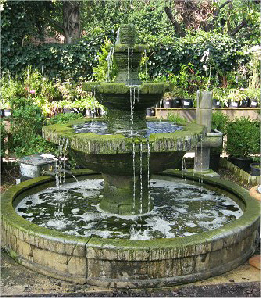
The Fountain on the right will cost you an arm and a leg! It would be really fun to have in your garden (as one or two of us may have) but most of us have neither the money nor the space to have this beauty! So we are going to cater for the majority of us who don’t have particularly large gardens but for whom a pond or water feature might be a nice possibility.
Let’s start with a pond. My definition for your pond is simply an area of contained water, i.e. you have some form of container set into the ground that holds a certain amount of water and I’d like to think the volume of water changes very little. i.e. the container doesn’t leak. You may suffer evaporation especially in the Summer but knowing our Summers you may well get it regularly refilled by rainfall.
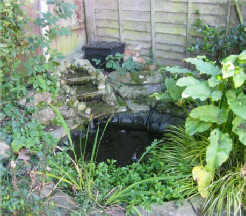
The pond on the is in a relatively small garden,tucked away in a corner but a real delight to its owners.
The pond on the is in a relatively small garden,tucked away in a corner but a real delight to its owners.
Before we get on to the ways we can go about constructing a pond or a pool, I need to ask you why you want a pond and perhaps you might think why you DON’T want to construct a pool.
You DON’T want a pool?
- If you have a very small garden - a small pool tends to look artificial and a bit of a mistake and you might prefer to read what I have to say about ‘water features’ instead. However if you have the money and the courage you could turn the whole of your small garden into a pool area with raised walkways across it. However, your neighbours might not like what goes with it – see below.
- If you don’t like wildlife or insects – a pool will attract all sorts of insects and whereas dragonflies may be beautiful to watch, mosquitos are not such fun to have around. If you don’t like frogs – no pond!
- If you have small children, no pond, for even a few inches of water can drown a small child! Having said that if you feel the benefits of a pool keep calling you and you have small children, then a strong raised frame and strong well-maintained netting is vital.
- If you want maintenance-free gardening, because in order to maintain a good looking pond area it will require quite a lot of maintenance by you.
- If you suffer from a particularly high water table because, as the ground water rises, it will lift the pond lining.
- If much of your garden is overshadowed by deciduous trees your pond will be overshadowed in the summer and in the Autumn you will constantly have to dredge the leaves which will, if left, decay and produce gases you don’t want.
- If your garden is largely in the shade for most of the day you are at a disadvantage: to maintain clear water, grow many plants well and attract wildlife, you need full sun for a good portion of the day at least.
Having said all that, and I haven’t put you off, the following are some of the positive reasons for creating a pond in your garden:
- It is a completely different addition to your garden which can provide an immense amount of pleasure as you work with plants that are completely different from anything found elsewhere in your plot.
- Water is often very restful and relaxing to watch and if you enjoy watching wildlife, it is an even greater potential source of pleasure.
- You may find yourself with fish in your pond, brought it as eggs on the feet of birds that are visiting from a nearby river, lake or gravel pit, and they can be fun to watch, although they may make the balance of the pool more difficult to maintain.
- Frogs and frog spawn are also likely to become inhabitants of your particular water areas and the frog(s) will feed on slugs and other garden pests.
- Your pond may attract birds who come to drink in the absence of other nearby supplies.
- If you can incorporate a fountain or artificial flow of water, the sound of running water or splashing water will add a further dimension of pleasure when you are sitting in the nearby shade in the middle of summer.
Now earlier on I have simply used the word ‘container’ because there are a number of ways you can go about creating your pond:
Now earlier on I have simply used the word ‘container’ because there are a number of ways you can go about creating your pond:
a) Natural
In a few limited areas where there is heavy clay, you can simply dig out your pond and allow it to fill with ground water, rainwater etc. This probably won’t be for most of us in Rochford however.
b) Concrete lined and painted
Simply dig out the hole and line it with concrete to between three and six inches thickness, depending on the ground support (you may need a rubble base first) and the depth of the pond – the deeper it is the heavier the water and the thicker you need it. Either include a water-proofer in the concrete mix or paint the dried concrete with waterproof paint. With a variety of other modern methods available today, that heavy work will probably be written off by you unless you have excess concrete (from some other job) that needs to be got rid of!
c) Flexible Liners
Flexible butyl sheet is relatively cheap and enables you to shape the pond as you go on. The following is the order of construction:
1. Decide on the size and depth of your pool.
2. Mark out the shape of your pond, remove the grass and dig down to create the size and shape of pond you want, leaving a shallow ledge about nine inches wide and deep from the top, including removing grass and soil if you plan to pave around the pond. You will need to allow for the thickness of the tile or slab paving plus for a bed of mortar. For a healthy pool it really needs to be at least three feet across and about eighteen inches deep at the deepest point.
3. Remember water finds its own level and therefore the top edge all around the pond needs to be the same level. Take a stake and place it in the centre of the pond area and then use it to place a straight edge and a level against it to check the outside ground surfaces so the eventual water level will be the same all round.
4. Line the dug-out pool area with about half an inch of damp builders sand, including on sloping sides after having removed sharp stones or roots. If not sand use an old carpet or polyester matting from a garden specialist.
5. Drape the liner into the hole gently pressing it down on the shape you have created, and anchor it with some bricks or stones around the top edge. Run water into the pool area with a hose pipe allowing the water to press out the shape of the pool and occasionally lifting the bricks or stones to allow for the shaping movement. A few creases will probably disappear when you add earth and plants into the water. Leave to settle for two day and top up
6. Trim the liner leaving an overlap of about nine inches around the edge which will be covered by the paving slabs which should be set on a mortar bed and should project an inch or so over the water’s edge. Point the slab joints with mortar. If you want a more natural look, don’t use paving slabs, but cover the liner edges with an inch or so of turf.
7. At least at one end of the pool let there be a sloping edge or a shingle ‘beach’ or stones/rocks in the shallows to allow small mammals to climb out should they fall in.
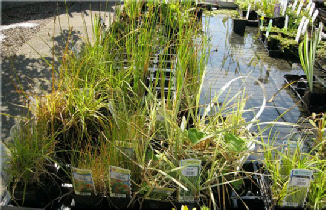
8. Decide what plants you will incorporate at the various depths. Rather than give lots of suggestions here about types of plants, your best bet is to go along to a Garden Centre, see what they have there and get their advice. These plants and indeed all the photos in this article were taken at Morleys of Wakering)
Alternatively, look out for friends who have ponds, see what they have and scrounge excess plants when their ponds are becoming overgrown.