Talk to us here at Rochford Life : 0786 342 7294 or E-mail us. For other numbers see individual pages.


Make a point of visiting us weekly! Tell a friend about us.
For your compost heap, the books tell you to layer it in 6 to 8 inch layers but I confess I never take that sort of care – and it still works well.
Basic suggestions to help towards a successful compost heap:
Basic suggestions to help towards a successful compost heap:
- Use a variety of materials – if you put in only grass it tends to make thick gunk that is horrible – mix it with other courser materials and you allow air to circulate.
- TV gardener Monty Don mulches his material before putting it in one of his three bins. I run courser material under the lawnmower before depositing it in one of the bins.
- Ensure that the heap is not completely dry – moisture helps it break down.
- If possible let the heap heat up otherwise seeds don’t get burnt up and you’ll grow some wonderful weeds next year. Some recommend that you cover the bin with sheets of old carpet to keep the heat in. The problem here is that you need to lift it off to get water in.
- Don’t put bones, eggshells or tomatoes on your heap. The first two don’t break down and you’ll never get rid of the tomato seeds and so find tomatoes growing in strange places next year.
- Turn the heap every 6 to 8 weeks. Gardeners disagree over this. I tend to do it every 3 to 6 months when it is convenient.
- If you can get hold of bags of straw/horse droppings from local stables, put the contents deep in the heap so as not to offend the neighbours’ sensibilities! (it stinks!). Don’t ever use horse droppings or chicken droppings (even worse) directly on your garden until it is well broken down and absorbed in the main compost.
- Avoid putting diseased plants on the compost heap (put them in the Council’s bin) and if you’re not sure about your bin getting hot enough (it probably will by the composting process) then keep down seed heads to a minimum and put them in the Council’s bin as well.
- If you want a faster process and beautiful fine material at the end, avoid lots of thick woody twigs which take much, much longer to break down. Give them to the council.
- Depending on your heap and the time of year, allow between 6 to 12 months before you plan on using the compost material in your garden.
Now is it worth all the effort? Let me tell you a simple but true story. Wanting to encourage my children into the ways of composting, the other year I challenged them to grow runner beans. They hadn’t bought into composting and so used ordinary soil. I dug in liberal quantities of my compost. Guess whose beans were twice the size and twice the quantity of the others? No, it wasn’t their crop!!!
Leaf Off!
When raking up the leaves, if you want to put them on a compost heap without them matting, I suggest you do it the easy way that I do, which is use your rotary mower with a collection box to finely chop them for ease of composting. Mixing them like that with grass cuttings speeds up the composting process.
If you want to try something different with your leaves, turn them into leaf mould which is good for digging into your soil next year. If you can chop them as above without lots of grass being included, then fill a black plastic sack with them, that has a few air holes, tie the bag round the top to stop leaves escaping and friendly hedgehogs settling in for the Winter and place out of the sun in a dark or shady place behind a shed for the winter. After a year you’ll have a fine crumbly material to improve the soil around the roots of woody plants and Clematis, or even for mixing in with hanging basket to help it hold extra moisture.
Enough said. Happy composting!
To return to front ‘Growing Stuff’ page, please CLICK HERE
2. Burn or Bin? No, Compost it!
If you’ve never thought about having a compost heap, here are some thoughts to nudge you in that direction.
Now in this day of green recycling bins, perhaps we have been seduced into being lazy, for without a doubt, it is quicker and easier to let the Council do it for you, and to simply dump anything that will decay into the recycling bin.
Just to remind ourselves, the Council’s instructions for the contents of the green and yellow bins are – Compostables! That gives it away; this is mostly stuff you could put on your own compost heap isn’t it? Their list includes, “kitchen scraps, and garden material including meat, fish, bones, dairy produce, fruit and vegetables, garden cuttings, flowers and leaves.”
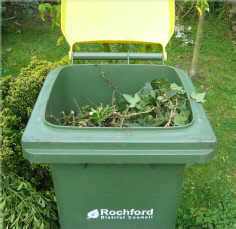
OK, but most of that will NOT be suitable for your compost heap, except fresh, uncooked vegetables, fruit, etc., and the garden cuttings, flowers and leaves. You really don’t want to put meat or fish on your compost heap unless you want to attract all the local cats or foxes – and rats! So, yes, let the Council have those.
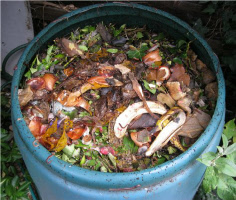
So why bother having your own compost bin or compost heap? The answer has to be twofold: to make yourself more environmentally aware, and to feed your garden. Currently I run a compost bin and two compost heaps.
The simple garden compost heap is easier to manage, I believe. It is possible to have just a pile but keeping it in a controlled ‘box’ shape is better. I collect other people’s wood cast-offs and so have built a double bin with each compartment about three feet square with a loose slatted front, to enable easy access when I want to start removing the end product. If you haven’t got plenty of wood, use whatever you can to create that shape. Chicken netting on stakes does the job.
So why bother having your own compost bin or compost heap? The answer has to be twofold: to make yourself more environmentally aware, and to feed your garden. Currently I run a compost bin and two compost heaps.
The simple garden compost heap is easier to manage, I believe. It is possible to have just a pile but keeping it in a controlled ‘box’ shape is better. I collect other people’s wood cast-
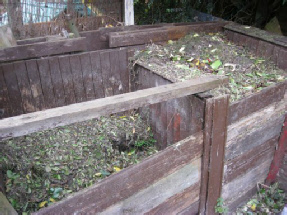
Two slatted ‘heaps’ (needing a little renovation) . The left larger one is about to be filled from the right one.
The compost bin is the green sort with a lid and in my case it’s more a ‘wormery’ than a compost; the difference is simply that the worms do all the work and the end product takes a bit longer but is wonderful for the garden when it’s done! The ‘original organics ltd.’ Website claims that a wormery can deal with cooked food as well, but I’m not so keen as it has the potential for going off first. They also talk about ‘tiger worms’ whatever they are, but my common or garden worms do a great job and the level in the bin falls steadily and the end product is great. If you don’t put in worms in the bottom of the bin and you site it on brick or stone or a concrete base, then it will just compost down on its own. You need a certain physical strength to lift the bin to remove the end product though and that may not be easy for everyone. Some bins have an opening and door lower down for removing the compost.